Table of Contents
With cordite in the air, splintered steel, shell casings and powder burns, there’s only one explanation...
Moderators: Joe Kari, Pardner, Breli
4 posts
• Page 1 of 1
GTK Radiant 1.4 & Q3Map2Toolz Installation
![]() by Pardner » Fri Jan 16, 2009 3:03 am
by Pardner » Fri Jan 16, 2009 3:03 am
Last edited by Pardner on Sat Jun 26, 2010 2:14 am, edited 21 times in total.
-

Pardner - SG Team
- Posts: 1786
- Joined: Fri Nov 18, 2005 5:48 am
- Location: MD, USA
Configure GTK Radiant 1.4
![]() by Pardner » Fri Jan 16, 2009 4:16 pm
by Pardner » Fri Jan 16, 2009 4:16 pm
Introduction
The purpose of this tutorial is to configure GTK Radiant 1.4 to work with the stand-alone release of Smokin-Guns. I have Smokin' Guns installed to "C:/Program Files/" and I have written all my paths as such. If you have installed Smokin' Guns to a different directory, read this tutorial carefully and change the paths to match yours.
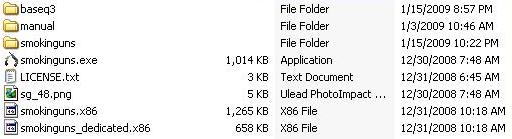
Clean SG Installation
You will need a clean (and functional) Smokin' Guns installation as shown below:
Get the files
Conclusion
GTK Radiant 1.4 should now be working with the Smokin' Guns stand-alone. If you follow this tutorial you should be able to map for Smokin' Guns without installing Quake3.
The purpose of this tutorial is to configure GTK Radiant 1.4 to work with the stand-alone release of Smokin-Guns. I have Smokin' Guns installed to "C:/Program Files/" and I have written all my paths as such. If you have installed Smokin' Guns to a different directory, read this tutorial carefully and change the paths to match yours.
Clean SG Installation
You will need a clean (and functional) Smokin' Guns installation as shown below:
Get the files
- GTK Radiant 1.4
- This is the actual level editor. Do not use the compiler that comes in it installation!!
- Do not try to run until you have installed the Smokin' Guns Mapping Tools
- Smokin Guns Map Tools
- Includes necessary files to make GTK Radiant 1.4 , Zero Radiant, and Q3Map2Toolz work correctly for the standalone of Smokin' Guns
- Also include the correct compiler for Smokin' Guns
- Includes all ASE models used in SG maps
- Includes two test maps "dm_test1.map" and "br_test1.map" Please compile these before attempting to make/compile your own map.
- Q3 Map2Toolz (mirror)
- This is a GUI front end to the q3map2.exe compilier.
- This is not necessary program. You can also use windows batch files.
- Used to call the compiler and compile your maps.
- WinZip or WinRar
- Install Radiant
Installing GTK Radiant 1.4 is pretty straight forward, but we are going to be making some changes along the way.
Since Quake III Arena is no longer used by SG, we will be installing the mapping tools into the Smokin' Guns directory.
Run the "GtkRadiantSetup-1.4.0-Q3RTCWET.exe" installer and click through the usual install process until you see this screen: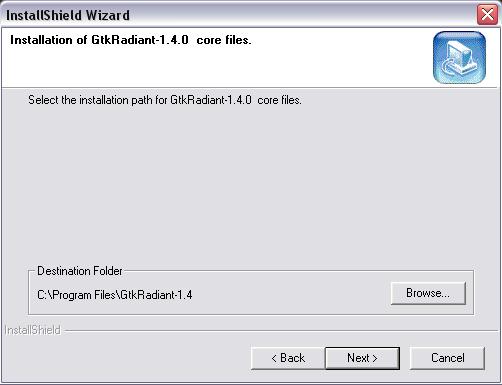
I have Smokin' Guns installed to C:\Program Files\Smokin' Guns\ so everything here is correct. Click "Next" & you should see a screen like this: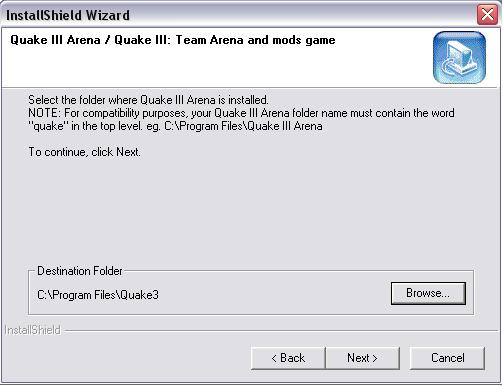
This is where we need to change things. Click "Browse" and change the path to where you have Smokin' Guns installed as shown below: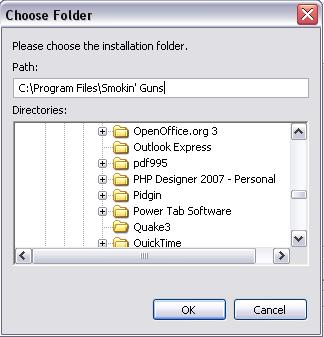
Click "OK" and then click "Next" The next screen you should see is asking for the name of the Radiant folder. By default the name is "Radiant-1.4";
this is good and you may click "Next". Assuming that you only want to map for Smokin' Guns you may click "Next" until you see this screen: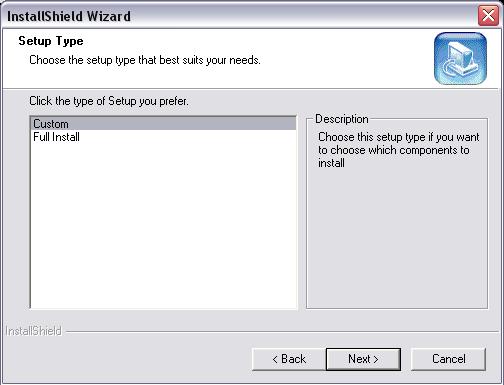
Select Custom and then click "Next" on the next screen, only select the options as shown below: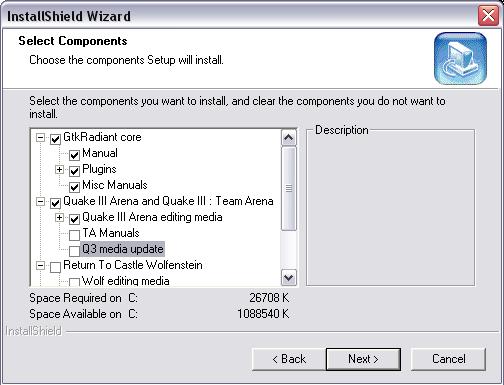
Then click "Next." The next screen ask you where you wish to install the start menu shortcuts. Click "Next" when you are ready. Finally, press "Next" to install GTK Radiant 1.4 - Install Q3Map2Toolz
If you plan on using Q3Map2Toolz, which is a front end GUI for compiling, you will need to install it now before continuing with this tutorial. Run the installation executable; where it is installed is not important, therefore "C:\Program Files\Q3Map2Toolz" is fine. - Unpack sg_mapping_toolz_v2.zip
- Extract sg_mapping_toolz.zip to your desktop.
- Open the newly extracted sg_mapping_toolz folder.
- Copy or move the GtkRadiant-1.4 folder to "C:\Program Files\" and select YES if asked to overwrite.
**NOTE**: If your path differs from C:\Program Files then you'll have to open "*/GtkRadiant-1.4/games/sg.game" with a text editor (like Notepad or Wordpad) and fix the paths to your directory. Don't forget to SAVE in your text editor. - Copy or move the smokinguns folder to "C:\Program Files\Smokin' Guns" and select YES if asked to overwrite.
- Copy or move the Q3Map2 Toolz folder to "C:\Program Files\" and select YES if asked to overwrite.
- Set-up GTK Parameters
Launch GtkRadiant-1.4.0 and you should see something like this: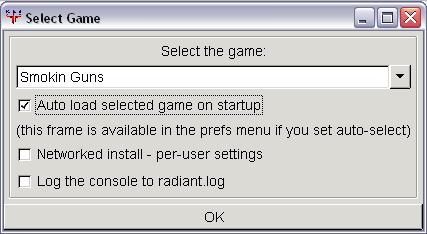
Select Smokin' Guns from the drop down menu and press "OK" and you will see something like this: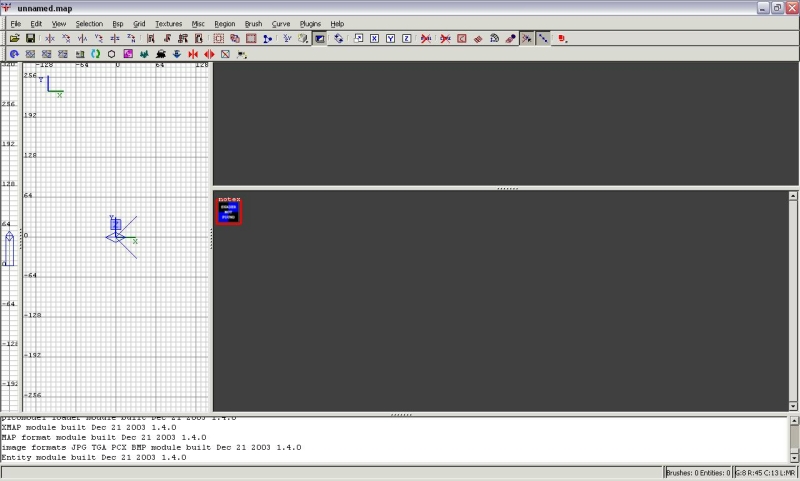
Conclusion
GTK Radiant 1.4 should now be working with the Smokin' Guns stand-alone. If you follow this tutorial you should be able to map for Smokin' Guns without installing Quake3.
Last edited by Pardner on Thu Dec 10, 2009 6:04 pm, edited 12 times in total.
-
Pardner - SG Team
- Posts: 1786
- Joined: Fri Nov 18, 2005 5:48 am
- Location: MD, USA
Edit and Compile Your Map
![]() by Pardner » Sun Jan 18, 2009 12:35 am
by Pardner » Sun Jan 18, 2009 12:35 am
Introduction
The purpose of this tutorial is to guide a user through the process of editing and compiling your first Smokin' Guns map. For this tutorial, I am assuming that the user followed the above tutorial to install GTK Radiant 1.4, Q3Map2Toolz, and the sg_map_tools package. For this tutorial, I will be compiling dm_test1.map and br_test1.map.
Open the Test Map
You should have two test maps that installed with the sg_map_tools. Launch GTK Radiant 1.4 and click open:

Select dm_test1.map and click "Open" and you should see a nicely made test map like this:

This is a great test map because is demonstrates all the different entities of Smokin' Guns. When you are finished browsing the map, click the save button:

Compile Your map
A q3map2.exe compiler (which was installed by Radiant) may be found in "C:\Program Files\GtkRadiant-1.4\" but this compiler does not support the entities needed to make a Smokin' Guns map. You will need to use the compiler that is included in our package to compile. There are many ways to use this compiler, but I will cover two ways in this tutorial;
Conclusion
You should be able to edit and compile your maps now! GTK Radiant 1.4 takes some getting used to, but you should have all the proper tools to get you started the right way. If you need help with using GTK, you should take a look through these great web pages.
Q3Map2Toolz adds a nice interface to the q3map2.exe compiler and can accomplish everything that can be done in a batch file. Batch files create a simple way to compile maps quickly. Different mappers have different preferences, and of course every mapper compiles differently.
The purpose of this tutorial is to guide a user through the process of editing and compiling your first Smokin' Guns map. For this tutorial, I am assuming that the user followed the above tutorial to install GTK Radiant 1.4, Q3Map2Toolz, and the sg_map_tools package. For this tutorial, I will be compiling dm_test1.map and br_test1.map.
Open the Test Map
You should have two test maps that installed with the sg_map_tools. Launch GTK Radiant 1.4 and click open:
Select dm_test1.map and click "Open" and you should see a nicely made test map like this:
This is a great test map because is demonstrates all the different entities of Smokin' Guns. When you are finished browsing the map, click the save button:
Compile Your map
A q3map2.exe compiler (which was installed by Radiant) may be found in "C:\Program Files\GtkRadiant-1.4\" but this compiler does not support the entities needed to make a Smokin' Guns map. You will need to use the compiler that is included in our package to compile. There are many ways to use this compiler, but I will cover two ways in this tutorial;
- Compile Using Q3MapToolz
Q3MapToolz should be all installed, so launch Q3Map2Toolz and you will see a screen like this: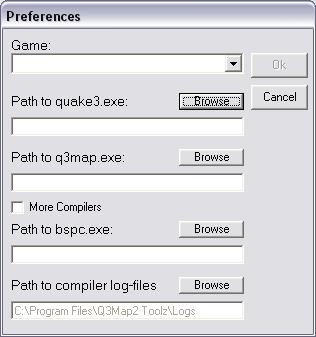
Change the information to match you install, like this: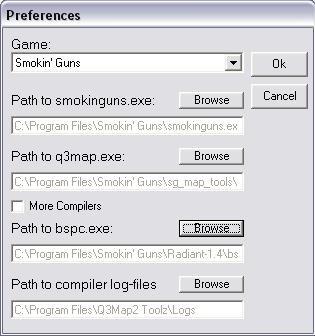
and click "OK". You should be looking at the Q3MapToolz interface. Select your map from the left and then check the box that says "fs_basepath" like this: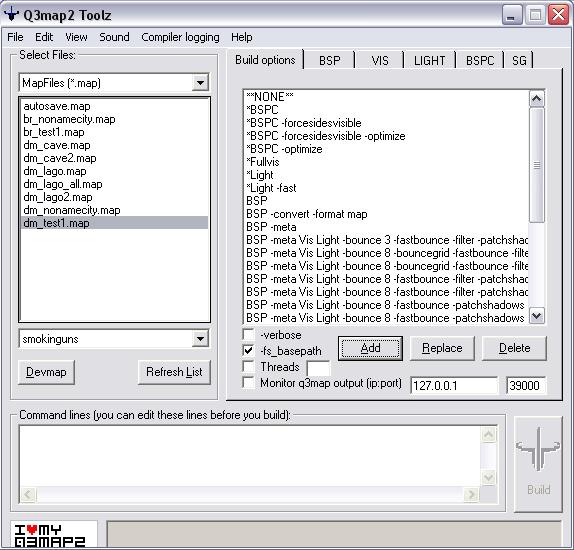
Then click the BSP tab on the top, click "Custom", and then scroll down and click the "-meta" box like this: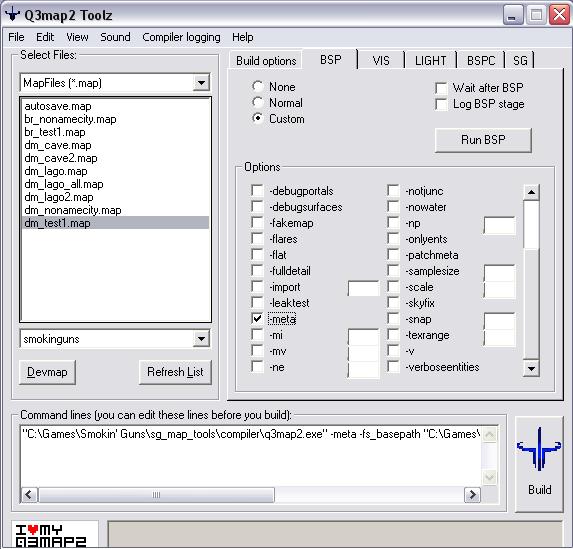
Now click the VIS tab and then click "Normal." Now click on the LIGHT tab and click the "Custom" option. Now check the following parameters: -patchshadows & -super. Add "2" to the box next to super. (Though it isn't shown in the following image, -samples 3 is a good option to add.) Something like this: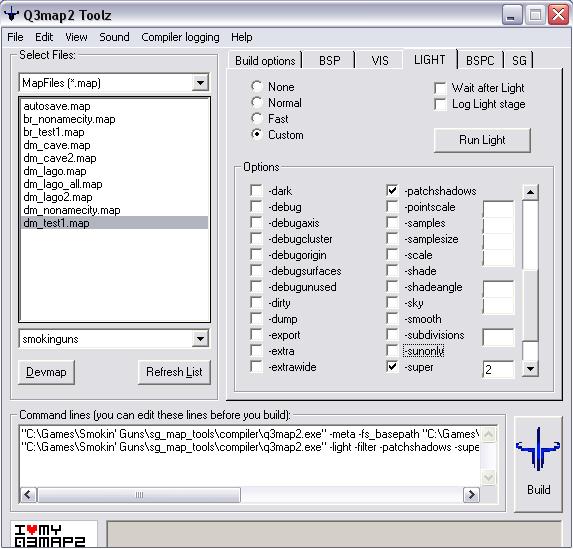
There are plenty of options that do different things, but this is a good starting point for the light stage.
Click over to the "BSPC" tab and check the options like this: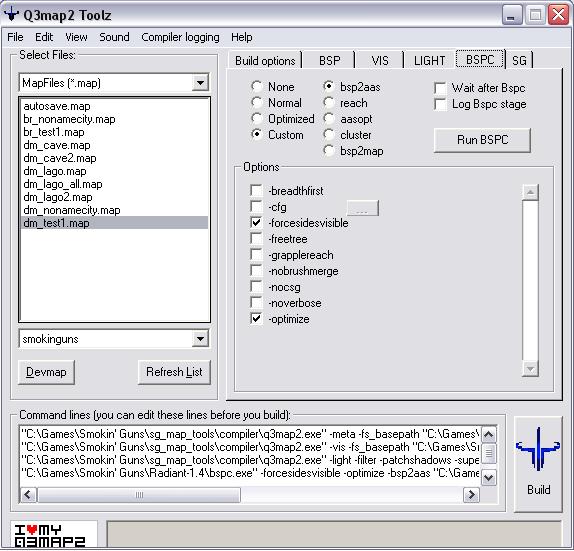
Click back to the "Build options" and click "Build" and you should see a DOS prompt window open and start to build your maps. When the compiler is finished, click "Devmap" and Smokin' Guns will launch and you will be able to play your new map. If you want to compile both the death match map and the bank robbery map at the same time, just select both in the menu to the left. - Compile Using Batch Files
Using a batch file accomplishes the same thing as Q3MapToolz does except it does not have a GUI to help you. You must include the compile switches manually. What is the advantage of using batch files? (1)It takes one click to compile maps. (2)You can compile multiple maps at the same time.(3)You can have it do system commands after the compile (such as launch smokinguns.exe or shutdown the computer).
To create a new batch file, open wordpad and save-as a ".bat" You should be able to run the batch file simple by clicking it (or double clicking it).
Here is the basic layout of a batch file needed to compile a Smokin' Guns map:- Code: Select all
q3map2.exe          [switches]     map
q3map2.exe   -vis   [switches]     bsp
q3map2.exe   -light [switches]     bsp
bspc.exe            [switches]     bsp
Now lets relate that to how we compiled dm_test1.map when we used Q3MapToolz. If we wanted to do an identical compile but using a batch file we would use the following:- Code: Select all
cd "C:\Program Files\Smokin' Guns"

"smokinguns\compiler\q3map2.exe" -meta  -fs_basepath "C:\Program Files\Smokin' Guns" "smokinguns\maps\dm_test1.map"
"smokinguns\compiler\q3map2.exe" -vis -fs_basepath "C:\Program Files\Smokin' Guns"  "smokinguns\maps\dm_test1.bsp"
"smokinguns\compiler\q3map2.exe" -light -patchshadows -super 2  -fs_basepath "C:\Program Files\Smokin' Guns""smokinguns\maps\dm_test1.bsp"
"Radiant-1.4\bspc.exe" -forcesidesvisible -optimize -bsp2aas "smokinguns\maps\dm_test1.bsp"

pause
smokinguns.exe +sv_pure 0 +devmap dm_test1
Conclusion
You should be able to edit and compile your maps now! GTK Radiant 1.4 takes some getting used to, but you should have all the proper tools to get you started the right way. If you need help with using GTK, you should take a look through these great web pages.
Q3Map2Toolz adds a nice interface to the q3map2.exe compiler and can accomplish everything that can be done in a batch file. Batch files create a simple way to compile maps quickly. Different mappers have different preferences, and of course every mapper compiles differently.
-
Pardner - SG Team
- Posts: 1786
- Joined: Fri Nov 18, 2005 5:48 am
- Location: MD, USA
4 posts
• Page 1 of 1
Powered by phpBB® Forum Software © phpBB Group
Style by Biondo – Based on Prosilver, inspired by Grunge
Gracefully hosted by Téquila - PKG.Fr

